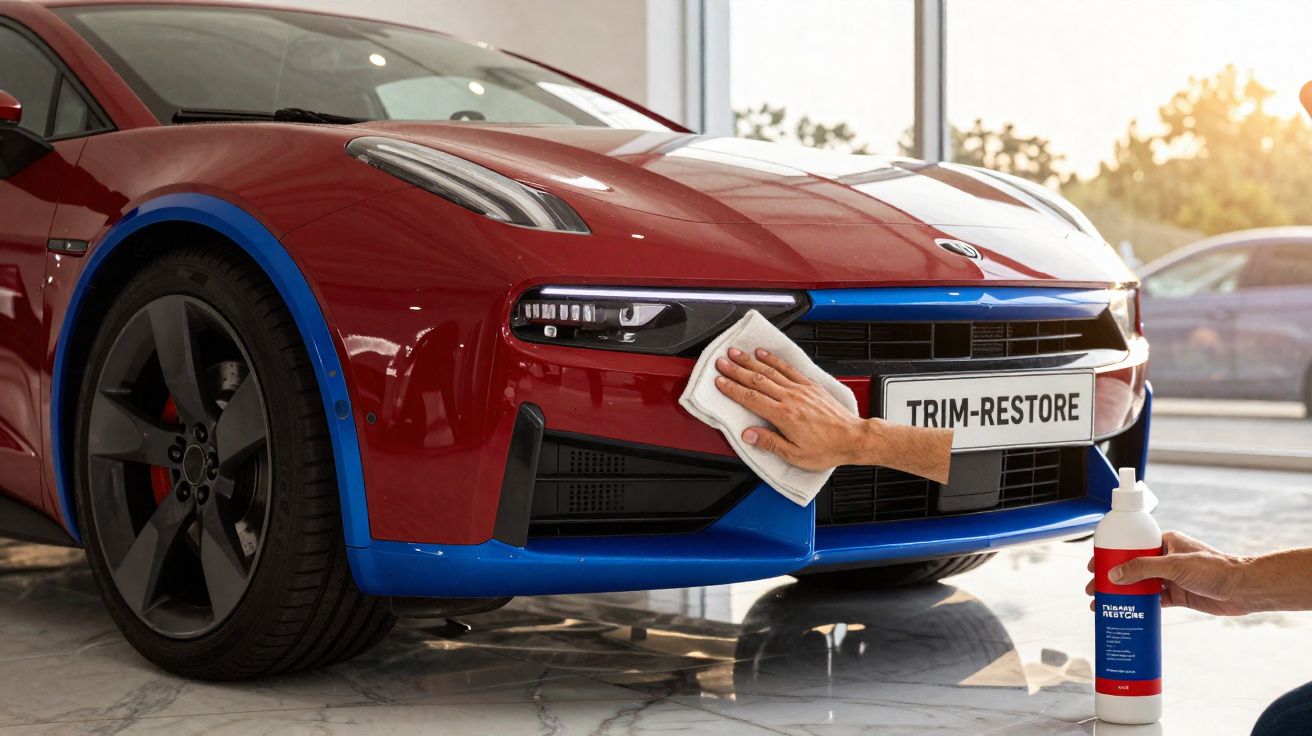
A sharp-edged classic car sits half in shadow. Its red trim strips look like faded memories-patchy, tired, almost purple-as though the years have been resting on them for too long. A small bottle labelled plastic colour enhancer, a neatly folded polishing cloth-and the atmosphere changes. The first swipe pulls a rich, living line through the dull red. The colour wakes up.
When red and blue plastic turns into stories on a classic car
Red or blue plastic on trim is like lipstick for a classic car’s silhouette. It frames the lines, sharpens the edges and quietly hints at the car’s personality. When those colours are worn out, the viewer’s gaze never settles, because the eye trips over every washed-out patch. It’s astonishing how much two simple actions can transform an entire car.
There’s a moment we all recognise: the car is freshly washed, standing in the sun-and that’s exactly when the trim shows its age. On the red 1980s coupé on my street, it wasn’t the paint that looked tired; it was a thin red-and-blue border on the bumper. That first wipe tells you more than any brochure ever could. The driver can’t help but smile when the colour starts speaking to the paint again.
So why do red and blue shades fade so noticeably on plastic? Pigments in plastic are exposed to constant UV radiation. Many reds are the first to lose depth, while the polymer itself forms a fine chalky layer at the surface. Blues often hold on longer, then suddenly tip into grey. The rest comes down to care: overly harsh cleaners, too little protection, too much sun, and too many years without attention.
Step by step: how to use a plastic colour enhancer and polishing cloth properly
The routine is quiet and exact: clean thoroughly, degrease, mask off, apply the plastic colour enhancer generously but with control, allow it to flash off briefly, then buff with a soft polishing cloth. If you mask the edges of the trim neatly, you save yourself a lot of frustration later and you get a crisp, straight boundary. A plastic colour enhancer isn’t paint-it revives the pigments that are already there and fills the micro-texture, rather than laying something new on top.
Before you commit, it’s worth doing a small test spot in an inconspicuous area so you can see how strongly the shade will deepen. Work in the shade, keep the plastic cool, keep your hands steady, keep the cloth clean. Let’s be honest: nobody does this every day. Done carefully once, the result can last for months-sometimes an entire season-depending on the weather, mileage and whether the car is garaged. A second, thin pass can increase saturation without going over the top.
The classic mistakes are always the same: too much product, not enough preparation, and rushed, inconsistent strokes. If you work on hot plastic, you’ll usually just grind in smears. Runs creeping into panel gaps? A cotton bud can rescue what’s still salvageable. A small workshop rule worth remembering:
“Plastic is honest: give it a clean surface, a touch of depth and gentle pressure with a soft cloth-and it thanks you immediately.”
- Cleaning: Use a pH-neutral cleaner, then degrease with isopropyl alcohol (70–90%).
- Masking: Protect adjacent paintwork, especially around corners and curves.
- Application: Thin and even, in straight passes-avoid swirling.
- Dwell time: Follow the manufacturer’s guidance, then buff with a polishing cloth.
- Aftercare: Keep it dry for 24 hours; later, top up with UV protection.
Choosing a plastic colour enhancer for red/blue trim on classic cars
Not every plastic colour enhancer behaves the same way. Some lean towards a satin, factory-style finish; others leave a wetter shine that can look out of place on period trim. If you’re working on a cherished classic car, aim for a product that restores depth without making the plastic look greasy, and always check it doesn’t streak on textured surfaces.
It also helps to think about long-term protection. Once you’ve revived the colour, regular gentle washing and an occasional UV-protectant top-up will slow the return of that chalky haze-particularly on bumpers, mirror caps and side mouldings that sit in direct sun.
A small job, a big difference
A dedicated plastic colour enhancer sounds like a niche detail, but in real life it feels like seeing an old photograph sharpen into focus. When the red trim glows again-or the blue on a mirror cap stops looking dusty-the whole car suddenly looks more cohesive. An hour, a cloth, a calm hand is often all it takes. When you take the small areas seriously, “quite nice” quickly turns into “wow-alive”.
| Key point | Detail | Benefit for the reader |
|---|---|---|
| Preparation | Clean, degrease, mask off, work in cool shade | Prevents smears and creates sharp edges |
| Application | Thin, even layer; respect the dwell time | Maximum colour depth without patchiness |
| Finish & aftercare | Buff with a polishing cloth; later add UV protection | Longer-lasting results and a more balanced overall look |
FAQ
Can I use a plastic colour enhancer on painted parts?
No. It’s designed for unpainted plastics. On paint it can look oily and may stain. Painted panels need polish or a sealant, not a plastic colour enhancer.How long does the effect last?
Anything from a few months to a full season. Garaged cars with occasional upkeep can go longer; daily drivers exposed to sun and rain usually won’t. A gentle top-up extends the result.What’s the difference between a plastic colour enhancer and a plastic dressing?
A plastic colour enhancer boosts pigments and fills micro-texture for genuine depth. Many dressings mainly add surface gloss and wash off sooner. Some high-quality products blend both approaches, but the focus is still colour saturation.Does it work on textured plastic?
Yes-often extremely well. Texture eats light; when the pores look “filled” again, the colour reads stronger. A soft brush can help work the product evenly into the recesses.What if the surface is heavily faded and chalky?
Clean more thoroughly, consider degreasing twice, then apply two thin layers. If the pigments are truly gone, only a pigmented system or a replacement part will solve it. A test spot will tell you immediately.


Comments
No comments yet. Be the first to comment!
Leave a Comment