The question was hanging in the air: can something like this really be safe? And how do you make it properly robust without emptying a DIY store? This is a small build story where timber starts to make sense again.
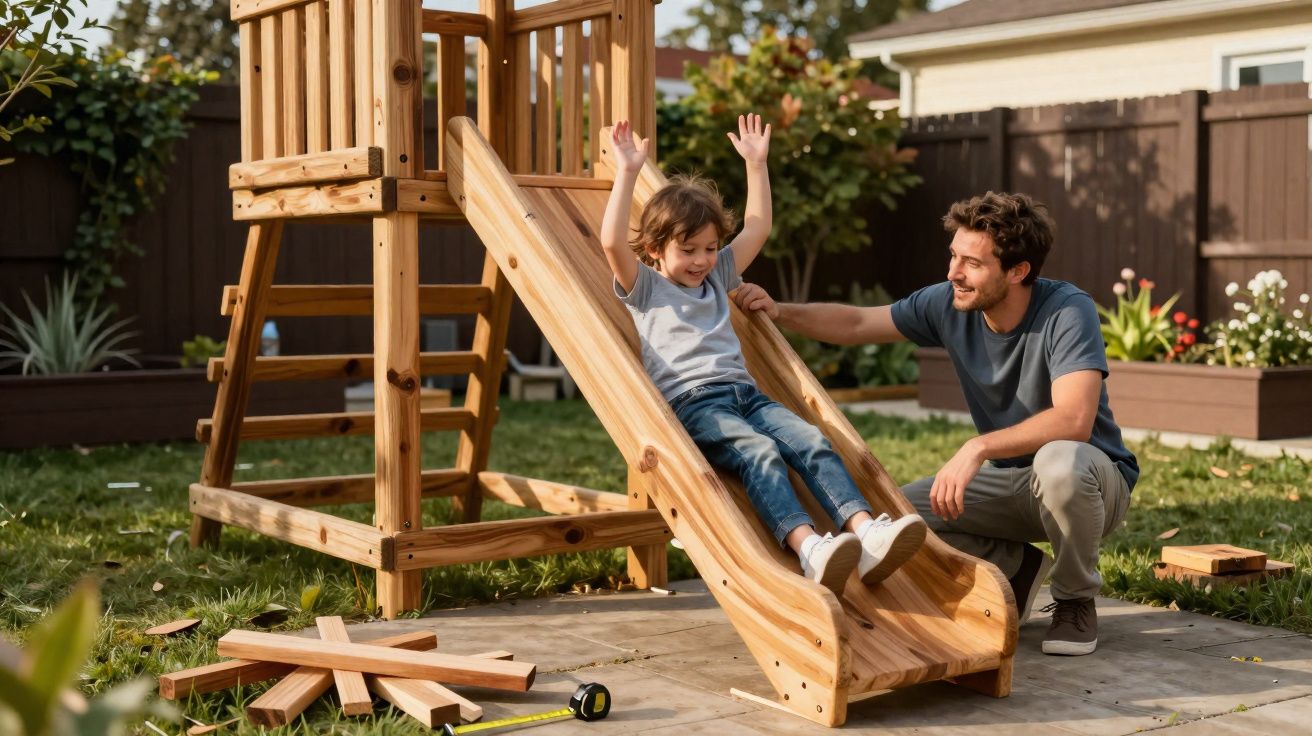
It’s Saturday, half past nine, and the driveway smells of coffee and damp wood. Dad lays the boards out on the ground like playing cards; Mum measures; their four-year-old runs a hand along an edge and snatches it back. A neighbour pauses, nods, and then stays longer. There’s debating, laughter, weighing things up, and changing minds. The dog watches with the seriousness of a building inspector. It sounds more like a street market than a workshop, yet the decisions being made here are the kind that hold weight. And then someone asks, quietly: will it hold?
Why reclaimed timber offcuts work for a slide
Offcuts aren’t automatically “scrap”. A lot of what’s left over from a previous job is dry, structurally sound, and often tougher than freshly bought softwood. If you pay attention to the grain, it becomes obvious: a low-knot piece of larch or Douglas fir shrugs off foot traffic, while a strip of birch plywood (multiplex) keeps its shape.
The key is to choose wood for the job it needs to do, not for how it looks. Wide pieces suit the slide bed, resilient battens make strong side rails, and solid beams belong in the underframe. That’s how a “set” of mixed parts ends up stronger together than any one perfect board-despite none of it being flawless on its own.
In the Ruhr area, the family found two 60 × 80 mm spruce beams, some Douglas fir decking boards, and a 12 mm sheet of film-faced plywood (Siebdruck). That became the run: Siebdruck for the sliding surface, Douglas fir as the side guidance, and the beams as the main bearers (under-supports). The child called the sheet the “racetrack”; Dad tested it with a 25 kg sandbag. The first run revealed the weak spot: the slide flexed in the centre. They paused, added a third bearer, and the issue disappeared. Small corrections aren’t failures-they become part of the structure.
Safety comes from proportions. A slide that’s 2.0 m long with a platform height of around 0.9 m creates a calm angle of roughly 28–30 degrees. Side cheeks that rise 12 cm above the slide bed keep small bodies safely on track. The run-out area needs enough length for speed to bleed off gently. Cross-bracing stops twisting; diagonals dampen bounce. Screws resist shear forces; adhesive spreads loads over a larger area. Thinking like that doesn’t just build something “nice”-it builds something stable. The family noticed it in the sound: there’s less creaking when forces have clear paths to travel.
Building a DIY wooden garden slide: how to make it safe and robust
The build order that proved itself: first the slide bed, then the bearers (under-supports), then the guard/handrails, and only then the ladder and anchoring.
- Plane the edges of the film-faced plywood (Siebdruck) cleanly.
- Form the side cheeks into a “U” around the slide bed using either 18 mm exterior plywood (multiplex) or 28 mm larch.
- Pre-drill before fixing; use 5 × 60 mm or 5 × 80 mm stainless-steel screws, countersunk, and “backed up” with D4 wood glue.
One 45-degree diagonal brace per side takes the wobble out of the whole system. Round every edge to at least an R5 radius, sand up to 180 grit, and build ladder stiles with rungs 25–30 mm thick. Keep the rung spacing at 20–23 cm. At the base, use two concrete blocks or ground anchors so the slide cannot creep. At the top, fit a handrail that’s genuinely easy to grip.
What people often get wrong is predictable: building it too steep, making the bed too slippery, or keeping the side cheeks too low. Another classic mistake is using nails instead of screws because it feels quicker. Everyone knows that moment of thinking, “It’ll probably hold.” A better habit is to drill one more pilot hole, add a washer where it helps, and actually clamp properly while the glue cures.
It also pays to treat the ladder as part of the safety system: add cross-grooves to the rungs or apply anti-slip strips. For the run-out, plan for impact from the start-rubber mats or bark mulch turn minor tumbles into stories rather than dramas.
Weathering, upkeep, and where you place it
Outdoor timber projects last longer when you plan for moisture and movement. Keep end grain sealed, avoid leaving water traps, and re-check fixings as the wood seasons. An open-pore exterior oil is often kinder than a thick varnish, because it’s easier to maintain and less likely to flake into slippery patches on a step or handhold.
Placement matters as much as carpentry. Choose level ground, keep the slide clear of fences and hard edges, and make sure the fall zone stays free of trip hazards. If you can, position it so the run-out isn’t aimed at a wall, a gate, or the corner of a patio.
Later, Mum said something that stuck.
“In the end it wasn’t the new boards that made the difference-it was the calm ten minutes when we went looking for the wobble and actually found it.”
- Slide angle: 30–35° for a faster ride, 25–30° for a gentler one.
- Side cheeks: 10–12 cm above the slide bed, 18–28 mm thick.
- Platform height: 60–120 cm depending on age and confidence.
- Fall zone: 150 cm clear all round, with a soft surface in the run-out.
- Ladder: rung spacing 20–23 cm, rung diameter 28–35 mm.
- Wood species: larch/Douglas fir outdoors; birch plywood (multiplex)/film-faced plywood (Siebdruck) for the slide bed.
- Edges: R5+ radius; sand all grip zones very smooth.
- Test: send 60–80 kg sandbags down the slide, listen for creaks, then re-tighten.
The surprisingly big impact of making it yourself
A slide is more than a slope with a handrail. It’s a promise: you can go fast here, but within boundaries. And boundaries can be friendly. The family sees it every afternoon when shoes thud on wood and sand chatters across the board. The structure ages with dignity-collecting scuffs and stories. Some days it becomes a racetrack for toy cars; then it’s a stage; then it turns into a “snack stall” draped in blankets.
When you build something with your own hands, you also build a shared language. That may be the kind of robustness that outlives any individual screw. And yes-you’re allowed to be proud of it.
| Key point | Detail | Why it matters to you |
|---|---|---|
| Material choice | Larch/Douglas fir outdoors; birch plywood (multiplex)/film-faced plywood (Siebdruck) for the slide bed | Durable, low-splinter, easy to work with |
| Geometry | 28–35° angle, 10–12 cm side cheeks, 150 cm fall zone | A safer ride, fewer falls |
| Fixings and joints | Pre-drilled holes, D4 glue, 5 × 60/5 × 80 stainless screws, diagonal bracing | Strength, less noise, easier maintenance |
FAQ
- Which timber offcuts are genuinely suitable? Use dry, straight wood without deep cracks or large knot holes. For the slide bed, film-faced plywood (Siebdruck) or birch plywood (multiplex) is proven; for bearers (under-supports), choose tough softwood such as larch or Douglas fir.
- How do I prevent splinters on handholds and sitting surfaces? Break edges with an R5 router bit, sand to 180 grit, and apply an open-pore oil finish. Treat grip zones extra carefully and sand them again if needed.
- Which dimensions suit toddlers? Platform height 60–90 cm, angle 25–30 degrees, side cheeks 12 cm. Use a ladder with easier steps and a handrail, plus a long run-out with a soft surface.
- Does the slide need anchoring? Yes-anchoring makes a huge difference against tipping. Ground anchors, screw piles, or weighted base plates keep it steady, especially while climbing on and off.
- How do I keep it quick without adding risk? A smooth slide bed is enough. Leave space in the run-out and avoid a lacquered “high gloss”. A light touch of wax is sufficient if the surface feels rough-then test again.


Comments
No comments yet. Be the first to comment!
Leave a Comment