You try tape, then pliers, then a quick search online. Up pops the most unlikely remedy of the lot: a potato. It’s half old wives’ tale, half straightforward physics. And it really can do the job - as long as you use one overlooked twist that makes it markedly safer.
I’d only just put a pan on to boil when the kitchen light crackled, blinked and gave up. Above me, the ceiling rose held a sad-looking ring of glass where a bulb used to be. I scraped a chair over the tiles, clamped my phone torch between my teeth, and peered up at the fitting as if staring might solve it. In the drawer I found batteries, faded instruction leaflets, a bag of screws that never matched anything - and a bag of potatoes nudging a whisk.
A neighbour had once insisted the potato trick was the answer. “Raw. Flat cut. Twist left,” she’d said, with the calm certainty of someone handing down a family recipe. I’d mentally filed it with vinegar for limescale and brown paper for bruises. Then a shard of glass clicked under my heel. I rinsed a potato, picked up a knife, and thought about the fear of broken glass - and the small, stubborn courage of sorting things yourself. The potato wasn’t the real point.
The odd logic behind the potato trick for a broken light bulb
A potato gets mentioned for practical reasons, not mystical ones: shape and friction. Raw potato flesh compresses around the jagged stump of glass, creating a broad, grippy contact patch that can transmit turning force without presenting sharp edges. Instead of focusing pressure on a few dangerous points, it spreads the load, helping you rotate the metal base rather than grinding into shards. In a tight ceiling fitting, that soft, compliant “pad” is surprisingly effective. It’s also cheap, usually close to hand, and oddly calming when the problem is literally overhead.
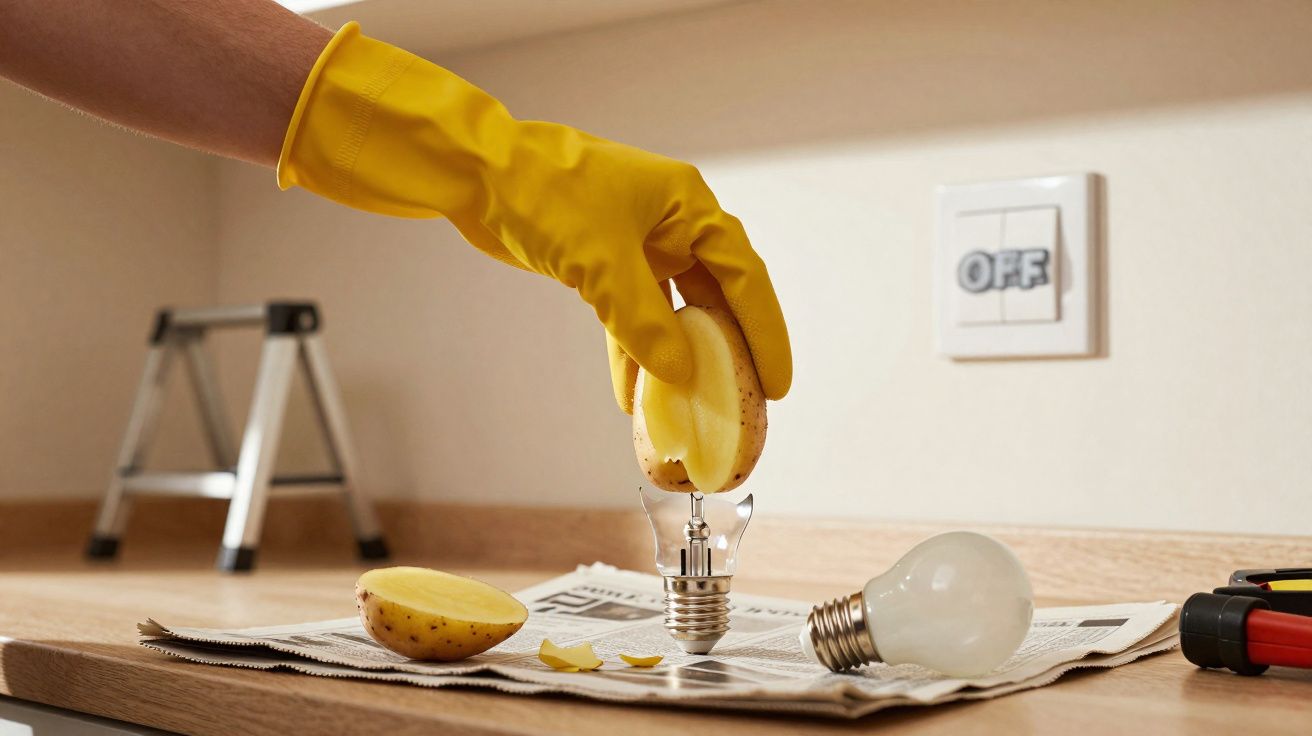
I watched a mate, Mo, deal with a dead bulb above his hallway mirror. He sliced a Maris Piper cleanly in half, dabbed the cut side dry, and pushed it firmly onto the broken crown. It didn’t wobble. He didn’t rush. He rotated his wrist anti-clockwise, slowly, like loosening a shoelace knot. The potato puckered and gripped; a moment later the threaded shell yielded with a quiet release. No fanfare - just a relieved breath, the potato into the bin, and a laugh at how well it worked.
The part that matters most: power, dryness, and the right fitting
None of this is worth attempting with the electricity still live. Water and electrics are an unforgiving combination, and the metal base of the bulb is in contact with the lampholder’s centre contact - that’s where the danger sits. Preparation beats improvisation, and keeping everything dry matters as much as grip.
The potato method is designed for Edison screw caps (E26/E27) - the spiral-thread type. It is not suitable for bayonet caps (B22) at all because the geometry is completely different. And if the lampholder looks scorched, melted or misshapen, treat that as a stop sign and walk away.
The underrated tip that changes everything
Here’s what almost never gets included when people repeat the “spud” fix: put a single layer of cling film (or a thin sandwich bag) over the potato’s cut face before you press it onto the broken bulb. That thin layer acts as both a moisture barrier and a catcher for debris. You still get the conforming grip, but you reduce the chance of potato juice finding its way into the fitting. The glass fragments end up embedded in the plastic rather than the potato, so they tend to come away neatly when you twist.
Do the set-up properly:
- Switch the power off at the breaker at the consumer unit - not merely at the wall switch.
- If you have one, check the fitting with a non-contact voltage tester.
- Give the bulb time to cool.
- Wear proper gloves and eye protection.
- Cut the potato cleanly so you have a flat pad, then blot the cut surface with a tea towel until it’s as dry as you can get it.
- Pull the cling film tight over the cut face so there’s no slack.
- Push straight up into the broken bulb (don’t come in at an angle) and twist anti-clockwise with steady, controlled pressure.
- If it doesn’t shift, stop and reassess rather than forcing it.
Most people don’t keep a voltage tester in the “random stuff” drawer. That’s exactly why the cling-film layer is such a useful extra safeguard: it helps keep the socket dry and keeps tiny glass splinters from ending up in your fingers later. Press, hold and turn gently - don’t try to muscle it like a stuck jam jar. Turn the power off at the breaker. Full stop.
“In DIY, the clever trick isn’t the tool - it’s the small precaution you add before you touch anything.”
- Stand on something solid and stable, not a dining chair.
- Use gloves and eye protection - glass is unpredictable.
- Choose a firm, raw potato (not baked, boiled, bruised or soft).
- Use this only for Edison screw bulbs.
- If you see scorching or smell burning, stop and call a professional.
Common mistakes, kinder fixes, and when to skip the spud
We’ve all been there: the room is gloomy, dinner is half-on, and you just want the light back. That’s when people skip the basics. They turn the wrong way, press at an angle, or use a wet potato and end up dampening the lampholder. The cling-film layer is surprisingly forgiving: it preserves grip while helping keep the fitting dry, and it traps sharp fragments so they don’t surprise you afterwards.
Another common problem is misplaced confidence. If the base refuses to move after a careful attempt, switch tactics. Needle-nose pliers can help: gently bend the metal rim inward to loosen the thread’s bite, then try the potato again. Avoid poking at the centre contact - that’s typically the live point. Don’t wrench on the light fitting itself either. If the lampholder looks heat-damaged, stop and call an electrician. Waiting an extra hour is far better than replacing a burnt lampholder tomorrow.
There’s also simple “bulb maths”: the potato trick is pointless for bayonet caps. Those rely on two pins locking into slots, not a screw thread. For B22 bayonet caps, use long-nose pliers to depress and twist the shell free, or use a purpose-made extractor. For recessed fittings, potato can smear the bezel, so pliers and patience are usually cleaner. Lefty-loosey still applies: twist anti-clockwise to remove. And if the fitting is above stairs or on a landing where you’d be balancing, the smartest tool is humility - use a proper platform or tower, not luck.
A practical extra: tidy-up, disposal, and the replacement bulb
Once the metal base is out, don’t rush straight to fitting a new bulb. Carefully remove any loose shards from the shade, bezel or lampholder area (with the power still off), and wipe the surrounding surfaces so you don’t later find slivers with a bare hand. Put broken glass and the old bulb parts into a rigid container before binning, rather than a thin bag that can split.
When you replace the bulb, match the cap type (E27, E14, B22, etc.) and check the fitting’s maximum wattage. If you’re moving to LED, you’ll usually be using a much lower wattage for the same brightness (look at lumens, not just watts). If the old bulb failed with signs of heat (brown marks, melting, a hot smell), that’s a hint the fitting itself may need attention before you put anything new in.
A small hack, a bigger mindset
What’s appealing about a potato - especially when you add that tight layer of cling film - isn’t the novelty. It forces a pause. You make the situation safe, reduce the risk, and give yourself a dependable surface to work with. That way of thinking scales up: you start noticing how moisture travels, how pressure spreads, and how tiny barriers can change the outcome. You might even keep decent gloves near the consumer unit - and finally buy the voltage tester you always dismissed.
Home repairs sit somewhere between anxiety and swagger. The tiny rituals are what separate the two. Dry the surface. Add a barrier. Plant your feet properly. Accept that some jobs push back, and that stopping at the right moment is a skill in itself. If you pass the trick on, pass on the safer version: the film wrap as well as the potato. Small improvements to old wisdom travel well.
| Key point | Detail | Benefit to the reader |
|---|---|---|
| Cling-film barrier | Wrap the potato’s cut face once to block moisture and catch glass | Safer grip without juice in the lampholder, tidier removal |
| Only for screw caps | Works on Edison E26/E27 threads, not on bayonet B22 pins | Avoids wasted effort and using the wrong method for the fitting |
| Preparation beats force | Power off at the breaker, gloves, eye protection, flat dry cut, gentle twist | Lowers the risk of shock, cuts, and damage to the lampholder |
FAQ
Does the potato trick work on all bulbs?
No. It’s only for Edison screw bulbs (E26/E27). Bayonet caps (B22) typically need pliers or a proper extractor.Is it safe for LED bulbs?
If the glass has shattered and the metal screw base is still stuck, treat it like any other screw-base bulb: isolate at the breaker, and use the cling-film wrap to keep things dry.Which way do I turn?
Anti-clockwise to remove; clockwise to fit. If it’s seized, make a small inward crimp on the rim with needle-nose pliers, then try again.What if the lampholder looks scorched or corroded?
Don’t continue. Replace the lampholder or call an electrician. Heat damage can cause insulation to crumble and expose live parts.Can I just switch it off at the wall?
Use the breaker at the consumer unit for certainty, then (ideally) confirm with a non-contact voltage tester. The extra minute is the real “hack”.


Comments
No comments yet. Be the first to comment!
Leave a Comment