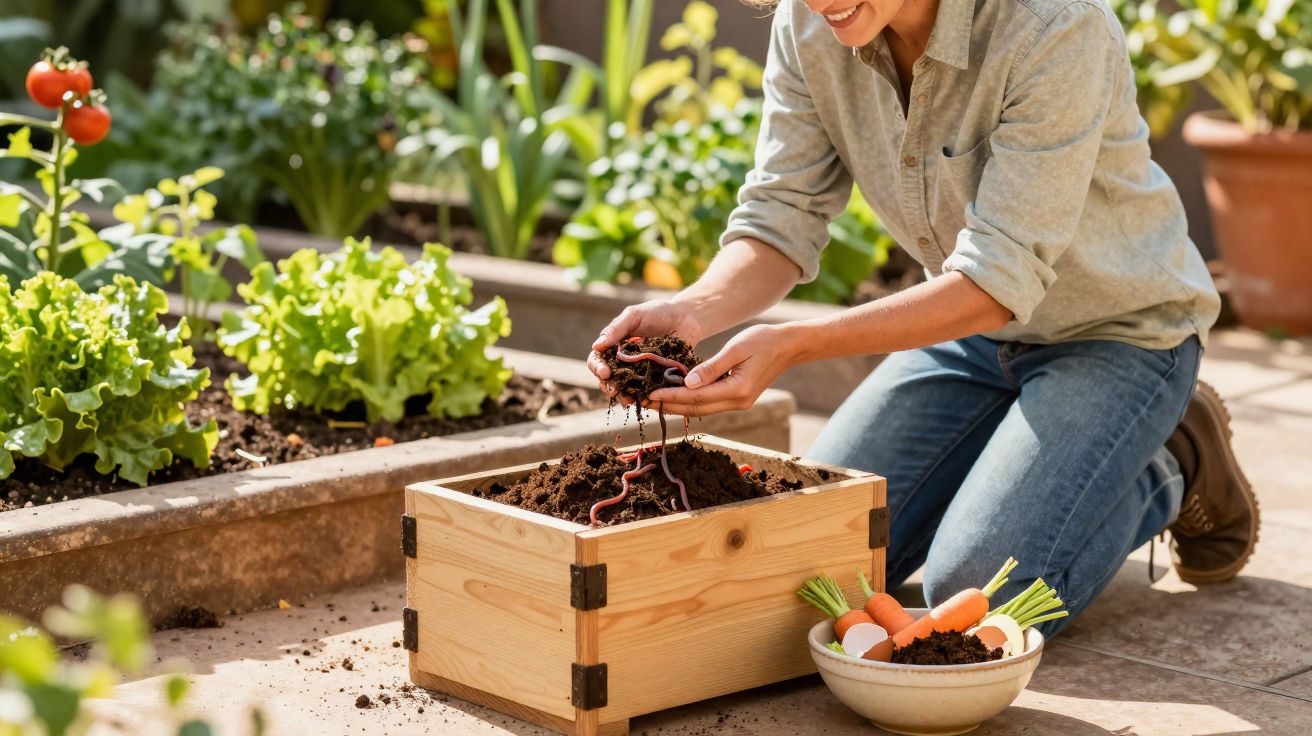
A gentle, earthy scent drifted up when I lifted the lid - nothing like a rubbish bin, more like a woodland track after a light shower. Red worms flashed through strips of cardboard and apple cores, as busy as quiet sparks. I’d tucked the small box under the utility shelf, half-expecting it to feel… a bit grim. Instead, it felt strangely optimistic: a private little household project, writhing with intent. Scraps go in; rich, living material comes out. A tidy cycle you can hold, then carry out to your potager (kitchen garden) beds with a smile you don’t necessarily share on Instagram. The worms barely acknowledge you, which is oddly liberating. You feed them, and a few weeks later your garden repays you. There’s something quietly enchanting under that lid - and it’s far easier than most people assume.
The small box that feeds a big garden: your worm bin
A worm bin isn’t a performance of eco-virtue or a guilt project; it’s a feel-good habit that becomes almost automatic after a week. Every cup of tea, every onion end, every carrot peeling turns into a small pledge to your soil. There’s genuine pleasure in the rhythm - a tiny, quiet chore that lightens the kitchen caddy and enriches your beds with something you can’t quite replicate from a shop.
I began with a £6 storage box and a small scoop of red wigglers (Eisenia fetida) borrowed from a neighbour’s thriving setup. Within a fortnight, the food caddy stayed noticeably lighter and the kerbside bin stopped smelling like surrender. Deep in potager planning, I tracked the difference in practical ways: tomatoes that didn’t mope and lettuces that held off bolting. UK households throw away vast amounts of food; even a single flat can redirect kilos each month. It’s a small move that carries a surprisingly long echo.
Why vermicompost works differently (and brilliantly)
Worms run on a different timetable from hot compost. They don’t need heat, turning, or heroic effort - just airflow, steady moisture, and a calm environment. Microbes soften the scraps first; then the worms graze the edges and thread everything through, leaving vermicompost castings that are dark, crumbly, and very much alive.
Those castings behave like a high-quality sponge in soil: they help retain water and gently balance nutrients so plant roots take what they need steadily rather than in sudden surges. A potager thrives on that collaboration between biology and soil structure. Taste a tomato grown with vermicompost and the “hype” stops needing an explanation.
Set up once, enjoy for years with red wigglers (Eisenia fetida)
Choose a lidded container of roughly 30–60 litres. Drill air holes near the top, plus a few drainage holes in the base (set it over a tray to catch any drips). Build a bedding layer with shredded cardboard and moistened coco coir, then add a pinch of garden soil to introduce helpful microbes. Aim for the feel of a wrung-out sponge, not soggy laundry.
Add 250–500 g of red wigglers (Eisenia fetida) and give them a day to settle before you offer food. Start modestly: about a mug of chopped vegetable trimmings, then cover it with more bedding. Put the lid on. No fuss. You’ve just started a quiet little factory.
A quick siting note: indoors, a utility room or cupboard keeps temperatures steadier; in a shed, tuck the worm bin out of direct sun and away from freezing drafts. If you’re worried about mess, keep a sheet of newspaper under the tray and you’ll spot any moisture issues early.
Feeding and care: low smell, low flies, high results
Offer small amounts often, and always bury scraps under bedding so fruit flies lose interest. Take it easy with citrus and onions, and avoid anything oily. Skip meat, dairy, and cooked sauces - they tend to go rancid, slump into sludge, and smell unpleasant.
If the bin ever starts to whiff or looks shiny and slimy, treat it as a moisture imbalance: add dry shredded cardboard and stop feeding for a week. Keep the bin above 10°C and below 25°C and the worms will tick along nicely. And let’s be realistic: almost nobody turns compost daily. A worm bin is forgiving - it tolerates missed days and simply resumes without scolding you.
Once a month, gently fluff the bedding with a hand fork to bring in air, then leave it alone. When the contents look chocolate-brown and crumbly, harvest from one corner and allow the remaining material to finish maturing. If you like a dependable routine, you can run two trays and alternate.
“It’s the only bin that gives me something back,” said Ruth, a South London grower. “I give it tea bags and it fuels my beans. Fair exchange, really.”
- Starter kit: 30–60 L box, drill, shredded cardboard, coco coir, handful of soil, 250–500 g worms.
- Target moisture: like a squeezed sponge. Add dry bedding if it looks glossy; mist lightly if it seems dusty.
- Feeding cue: only add more once the previous feed has mostly disappeared.
- Fast fix for gnats: lay a sheet of damp newspaper on top and cap it with dry cardboard.
- Harvest window: allow 8–12 weeks for your first modest batch of castings.
One more practical tip many beginners miss: check your “compostables”. Some tea bags and labels contain plastics; if in doubt, remove the bag (or choose plastic-free brands). Chop scraps smaller for quicker processing, and freeze peelings if you want to reduce fruit-fly risk and soften food before feeding.
From scraps to potager swagger with vermicompost
There’s a particular day when you empty a tray and what falls out looks like ground coffee rather than rubbish. That’s your cue. Sieve it gently, returning any wrigglers to the bin as if you’re seeing friends safely home.
Use the castings with intention: - Add a handful to each planting hole for tomatoes and courgettes. - Top-dress along rows of rocket and beetroot. - Blend 10–20% into seed compost for seedlings that stay sturdy instead of sulking. - Make a quick, aerated extract for watering in new plants, or simply tuck a thin ring of castings around thirsty herbs.
We’ve all had seasons when the garden seems unmoved by our effort. Vermicompost nudges the balance back - not with flash, but with a steady, almost invisible kindness you notice in flavour, fragrance, and resilience. Your potager beds take on a quiet sheen of health, and you relax into the work a little more.
| Key point | Detail | Why it matters to you |
|---|---|---|
| Start small, stay consistent | 30–60 L bin, ventilated lid, damp bedding, 250–500 g worms | Straightforward setup for a flat or shed, with minimal faff |
| Feed with care | Chopped veg scraps, bury under bedding, go gently on citrus and oils | Less smell, fewer flies, faster and cleaner breakdown |
| Use the “black gold” properly | Top-dress, mix 10–20% into seed compost, water-in extract | Stronger plants and noticeably better-tasting harvests |
FAQ
Which worms do I need?
Use composting worms, mainly red wigglers (Eisenia fetida) or red tigers (Eisenia andrei). Common garden worms prefer soil and generally won’t thrive in a worm bin.Will it smell?
A healthy bin should smell pleasantly earthy. Bad odours usually mean too much wet food or too little dry bedding. Add shredded cardboard, fluff lightly for airflow, and pause feeding for a week.How long until I get usable castings?
Expect your first harvest in roughly 8–12 weeks, then repeat batches every few weeks if you keep a steady rhythm. Warmer indoor spots typically speed things up.Can I keep a worm bin in winter?
Yes - as long as it remains above 10°C. Indoors, a utility room or cupboard is ideal. Outdoors, insulate the bin and keep it dry and sheltered.How do I use castings on my potager beds?
Sprinkle a thin layer around plants, put a handful in each planting hole, or mix 10–20% into seed compost. For watering-in, stir a cup into a bucket of water, strain, and use the same day.


Comments
No comments yet. Be the first to comment!
Leave a Comment